Installation instructions for the Rimgard Kit
Please read this information before applying the Rimgard system to your wheel rim.
WARNING: The Preparation Wipes should be kept away from any open flame or heat source as they are flammable. Once used they should be disposed of safely. For more information please go to www.microcare.com.
If your vehicle hits the kerb with excessive force you should ALWAYS inspect the wheels to ensure that the Rimgard System is still intact and on the wheel rim.
If the tape is broken remove the Rimgard System and clean any excess tape residue from rim before replacing with a new Rimgard System.
The Rimgard kit will contain:
4 x Outers (either Silver or Black]
4 x Preparation Wipes
1 x Full Installation Instructions
However this is subject to change at any time without pier notice being given at the discretion of Rimgard Limited.
We warrant that the Rimgard System will be free from material defects manufactured by Rimgard Limited in New Zealand for a period of 1 year from the date of purchase [with proof of receipt].
The Rimgard System when installed and used in accordance with the manufacturers instructions, may reduce the severity of damage to rims for some minor incidents.
We do not guarantee that the Rimgard System will reduce all or any damage for every incident. We make no other warranty, express or implied and to the fullest, extent permitted under applicable law, hereby disclaim all implied warranties of merchantability or fitness for a particular purpose.
Please ensure that your wheels rim surface is a flat and undamaged area. enough to take the Rimgard System.
Rimgard Limited undertakes at its sole discretion to repair or replace any faulty Rimgard product within the warranty period. The foregoing shall constitute the exclusive remedy for breach of warranty hereunder.
This warranty does not cover any damage to product due to abuse, negligence, abnormal use, accident or improper installation or use.
This warranty is given on the understanding that the Rimgard System is installed according to the manufacturers installation instructions. This warranty does not cover any damage to product due to abuse, negligence, abnormal use, accident or improper storage (do not subject to heat or direct sunlight prior to fitting to wheel rim surface), installation or use.
Warning: removal of installed Rimgard System may damage painted or refurbished rims.
Do you have a pre-sale question?
Got an issue with the Rimgard system?
You can contact us through the contact page and we will get in contact with you as soon as possible.
Checkout the installation video
The below video will give a step by step approach to installing Rimgard
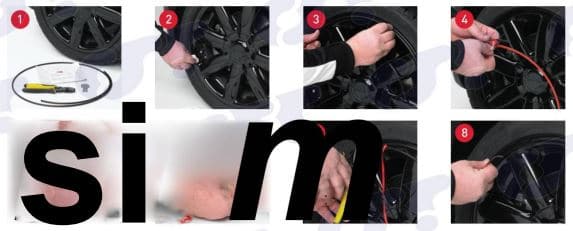
Installation Instructions
Note: Please cut 5mm off each end of the Rimgard Base
before installing.
-
- Wash wheels, allow to dry and have all required parts and tools ready. (cutters or knife not included).
-
- Use Rimgard wipe (4 wipes supplied in one pack xl per wheel) to remove any residue or contaminants that may remain on the wheel rim.
-
- OPTIONAL - For optimum results for installation of Rimgard it is recommended to apply 3M adhesion promoter to rim surface prior to attaching Rimgard base track. (Adhesion promoter sold seperately)
-
- APPLICATION OF ADHESION PROMOTER - Tear Side of adhesion promoter packet to expose application sponge. Hold packet of adhesion promoter at the bottom taking care not to squeeze out liquid. Wipe adhesion promoter evenly across the clean, dry surface of rim and wait 90 seconds for promoter to flash (dry).
-
- 4ft - Choose the location on the wheel rim that the Rimgard base will adhere to, making the entire surface of the rim is completely undamaged for the adhesive tape to be applied to.
-
- Carefully peel off backing from the tape in 1/4 sections. Gently press peeled off end of Rimgard onto the desired part of the wheel rim making sure to hold the rest of the Rimgard base away from the wheel to avoid accidental adhesion.
-
- Make sure you do not handle the tape as this could potentially reduce the adhesion.
-
- Follow the wheel contour whilst pressing the Rimgard base firmly in place to complete the circle.
- Carefully mark the Rimgard base and cut to desired wheel size ensuring both ends are flush together, NO GAPS, discard any excess Rimgard base when finished.
-
- Press the Rimgard base on the wheel FIRMLY, making sure the Rimgard base is well fixed to the wheel.
-
- Insert the Rimgard PinstripeTM (Inserts) into the Rimgard base,cut to desired length, making sure the PinstripeTM (Inserts) join is at opposite ends to the Rimgard base join, NO GAPS.
-
- Push the completed Rimgard System on to the wheel rim FIRMLY to achieve maximum adhesion. Allow up to 72 hours for full adhesion. Vehicle can be driven immediately once all Rimgard Systems are fully installed. Do not wash wheels for 72 hours once fitted to allow full adhesion.
PLEASE ENSURE TO FOLLOW INSTALLATION INSTRUCTIONS WHICH CAN BE FOUND ON OUR WEBSITE.
DO NOT APPLY WHEN WHEEL IS WET OR DAMP.
The desirable tape application temperature range is 20c to 40c. The minimum suggested surface temperatures for tape application is 10c. Once properly applied, low temperature holding is generally satisfactory down to -40c.
Rimgard Limited Guarantee
At Rimgard we are committed to the highest quality in the design, manufacture and service of everything we sell.
All products supplied by Rimgard undergo vigorous Quality Assurance testing.
However, as with any mass produced products, there will always be the probability that a tiny percentage may exhibit a fault, which is why we offer a full 12 month guarantee against all defects caused by faulty workmanship caused in manufacture from the date of purchase on all Rimgard products.
What is Covered?
The replacement of your product if your product is found to be defective due to faulty materials on purchase (proof of receipt required).
What is not covered?
Rimgard shall not be liable for costs of replacement to a product incurred as a result of:
-
- Normal wear and tear
-
- Accidental damage, faults caused by negligent use or care, neglect, careless operation or handling of the product which is not in accordance with the Rimgard Instruction Leaflet
-
- Use of parts or accessories other than those produced or recommended by RimPro-Tec
-
- If you change your mind and no longer wish to use a Rimgard product
-
- Consequential losses
To us, customer satisfaction is paramount. If you find you have a faulty product, return the product to the retail outlet you purchased the product with your proof of purchase and they will be happy to assist you in replacing your item.
A refund will only be made provided that:
-
- A genuine fault has been identified
-
- Evidence from the consumer that they could not get the product to perform as it was intended to
-
- A current mailing address, contact telephone numbers and email address is provided
Due to ongoing development, designs, specifications and documentation are subject to change without notification. No liability will be accepted for errors, omissions or amendments to this specification.
Conditions may apply.